 ***there is no guarantee that the following pattern will in fact produce a sleeping child
First off, "HELLLOOOoooooo dear blog friends!"
You thought I'd lost myself in a deep mommyland abyss didn't you?! Well no my dearest, despite reflux, stomach bugs, potty training & mastitis (TMI, I know...) I'm still trucking along & somehow by the dear grace of my Lord above I was able to sew something!!!
I don't know what it's like where you live but around here it's getting downright chilly. Despite my best effort to bundle up little Soph she still wakes up every night with icebox hands. That's why I decided to make an uber-warm, fully lined, mitten sleeved sleepsack for her. (anything that might produce more sleep is worth the effort in my book)
The outside is a no-pill fleece print from Jo-Ann's (50% off this week!) & the lining is this luxuriously soft chamois type fabric that I snagged from the fabric store scrap pile over a year ago. Throw in a 22" long zipper, a sleepsack to make the pattern from & a panini sandwich (mmmm...cheeeese) & you've got everything you need to make your own ultra cozy sleepsack.
 With the directions below feel free to leave out the sleeves for a traditional sleepsack (& super fast project) or leave out the lining if you want it for more everyday use.
First things first, I got Samster down for a nap & tucked Sophster into her swing...
 Next I got started making my pattern by using one of Sophie's existing sleepsacks. I make most of my projects by drawing patterns from existing items, I find it easiest to use a big roll of paper (Ikea) & a highlighter to outline my pattern since I inevitably will get some on the clothes. Then I add a 1/4" seam allowance around the outside of the drawing.
 Use your new pattern to cut out 1 piece of your outer fabric & 2 of your lining fabric.
 Take one of the two lining cutouts & slice it right down the middle. Also cut a V shape at the neck. These will be the lining pieces for the front half of the sack.
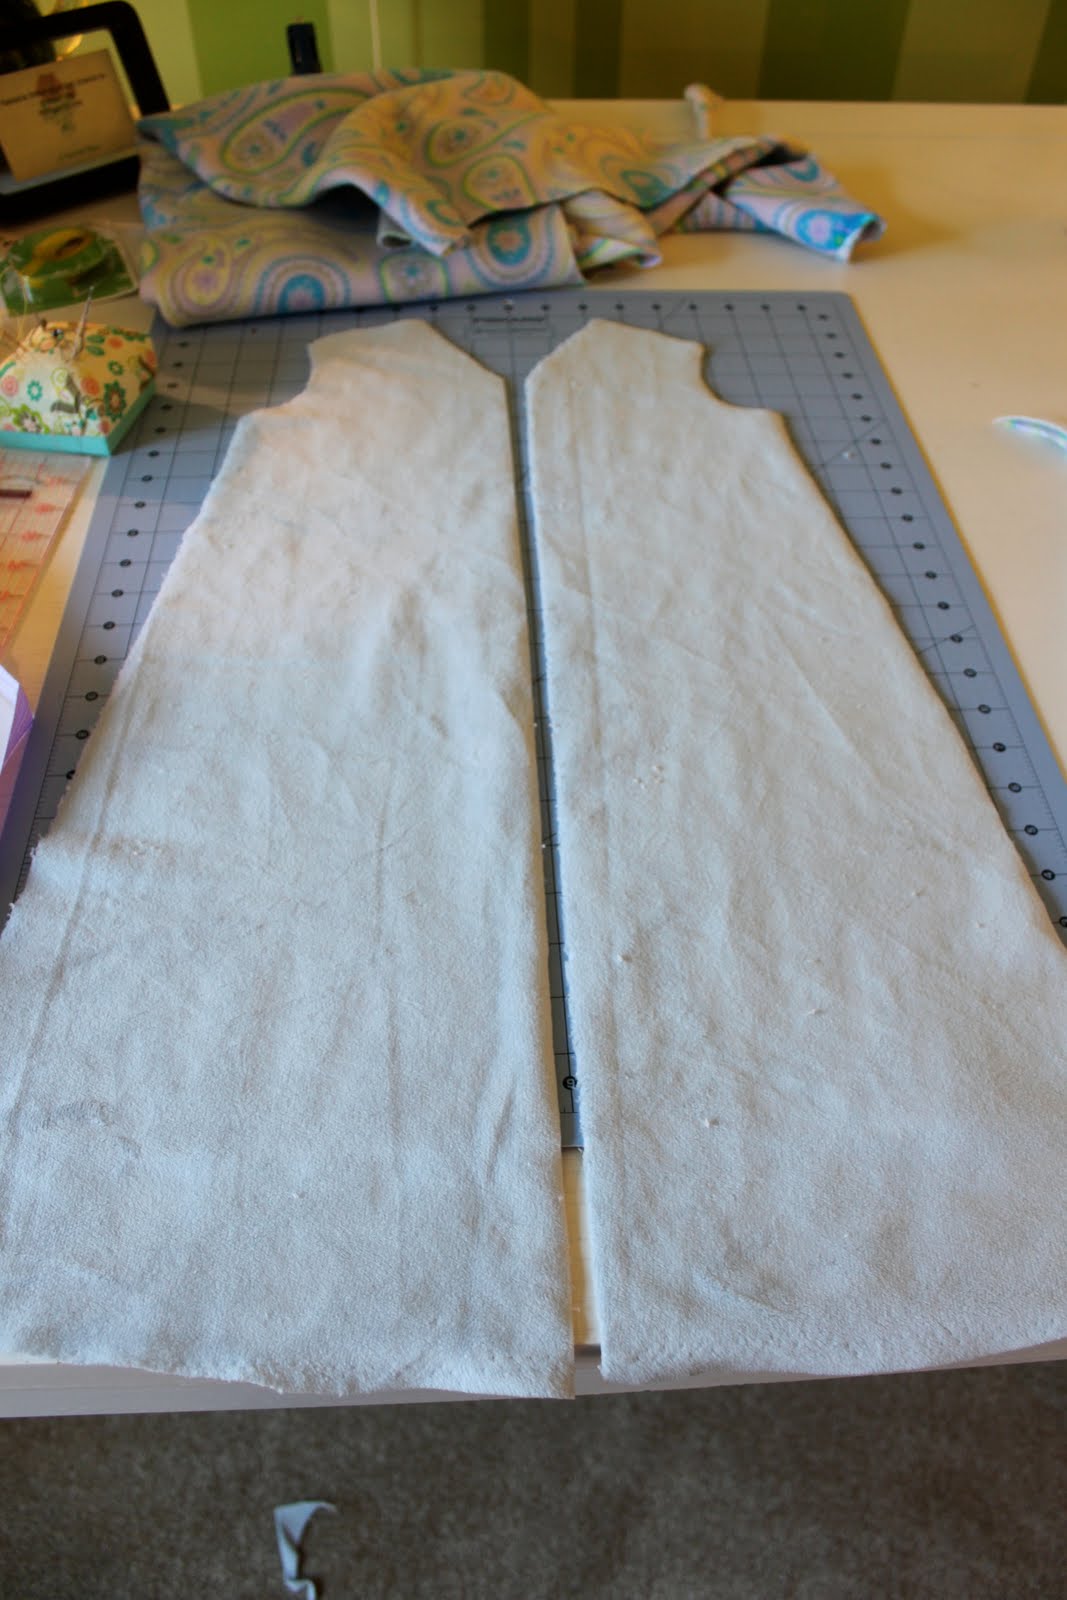 To make the outer front pieces place one of your new lining fabric halves on top of your outer fabric & cut out the outer fabric to the same dimensions except for adding 1" along the inside edge. (this is going to be used for your zipper lining)
 Next while you're still in the pattern making mood go ahead & whip up some sleeves. I used a pair of Sophie's pj's whose armholes were roughly the same size as my sleepsacks. Be sure to fold the fabric in 1/2 along the top of the sleeve that way you'll only have to sew up the bottom to form a tube. Cut out 2 & set aside.
 Now back the main body...time to sew in your zipper. (let me just say this is the first time I've ever sewn a zipper into anything. They intimidate the crap out of me. I tried reading the enclosed directions but they were all in professional seamstress jargon & I just couldn't translate. The way I ended up doing it may not be appropriate zipper etiquette but it did work for me so I'm happy with it. The end.)
Working with just the front sleepsack pieces I pinned my lining & outer fabrics together so they were all lined up. Next I folded the 1" extended piece of the outer fabric over & pinned it along the zipper.
 (In the picture below bottom piece is what it looks like when you pin the extended piece over & then if you flip it over & stitch it to the zipper it'll look like the top one)
 For stitching the zipper on I worked with it zipped, first down the left & then down the right.
I did lots of pinning first to make sure it would lay properly.
 I also hemmed the edge of the neck "V" above the zipper.
 Repeat on opposite side of zipper, unzipping if you need to.
Now that you have the front piece finished you'll need to hem the neckline along the back 1/2 of the sleep sack so it matches up with the "V". I just pinned it over & stitched it down.
 For both that seam & the "V" hems I did one straight stitch seam & one scalloped looking zig zag stitch. It ended up this way because of a mistake I made not catching the lining the first time I stitched it but I kind of like it...
 Next up, with your right sides facing together go ahead & stitch across the shoulders. Afterwards open the two pieces up & take a sleeve piece (opened up as well) & pin it along the armhole area.
 Stitch one sleeve along the "armhole arc" & then repeat on other side.
At this point the swing was no longer cutting it for Soph but I was determined to finish.
Bring in the Bjorn...
 Now for the little mitten cover ups I basically just sewed a little flap of fabric into the sleeve that could be flipped over to cover hands or left flipped up to allow the hands to come through the sleeve.
  You've probably seen these on most newborn long sleeved onesies or those little kimono tops they wear in the hospital. Well, I confused the heck out of myself with how to sew them on & in the end did it wrong so if you want to give it a try I'd say take a good long hard look at a onesie that has them. If you figure it out correctly please let me know!
And finally the last step...whew!
Take your entire piece & turn it inside out. Take great care to smoooooth out the fabric (paying special attention to catch both outer fabric & lining) & pin along the perimeter of the sleepsack & bottom of sleeves.

 Stitch one nice long stitch around the whole thing, flip it right side out & wah-lah!
 I think my husband's comment sums it up..."can you make one in my size?"
Great tutorial! Wish I had done something similar for our winter which has just been and gone..... Hope Sophie sleeps better, it looks like it may do the trick :)
ReplyDeleteShe is getting so big! She's adorable! This was a great tutorial, those sleep sacks cost way too much at the store!
ReplyDeleteFirst off - miss Sophie is simply adorable!
ReplyDeleteAlso, I make my patterns the exact same way - yay IKEA paper!
She is so adorable. You are getting your groove back again, yahoo! I hope she sleeps a very long sleep for you now, that is just too cozy not to.
ReplyDeleteAwesome tutorial! I have a big roll of paper, too, but I don't know where it came from...
ReplyDeleteI agree with your hubby! I want one in my size :)
ReplyDeleteCan I please just tell you that I envy you and the time that you find to even post an new blog entry. :-) The sleeper looks so nice and cozy, I hope Sophie sleeps better! Sorry to hear about your mastitis, hopefully you are better now.
ReplyDeletesooooo cute!!! Great job!
ReplyDeleteLooks great. I should probably make one for my 8 month old.
ReplyDeleteHurra for you! I could have used this tut. 1½y back. I needed a summer sleeping sack for a 9m. girl but here in Denmark they didn't meet my recurements, either too small or too warm. So I took a dress pattern and added length to it, a zipper on the side and elastic-waist-ribbon over the sholders. She can still fit it and when we use it she cant kick off the blanket.
ReplyDelete(I hope this makes sence, it would in Danish)
What a great little project. She looks all snuggly and warm....and maybe it will really help with the sleeping..LOL!
ReplyDeleteShe looks just like Samster! Adorable. And tell the hubs to get a Snuggie!
ReplyDeleteLove it! She is too adorable. I've got my baby in fleece jammies but she refuses to keep her hands under the blanket so the little flip over mittens would be awesome! Glad to see you back to sewing and crafting. I'm still not quite there yet. I just need to get this little one to take a nap longer than 20 minutes during the day!
ReplyDeleteI love it!! And Sophie is getting soo big! She is just too cute!! : )
ReplyDeleteI love this!!! I think I might have to make one for my niece!
ReplyDeleteI made one of these a couple years ago. I used a separating zipper so that I could install it upside down. This way, when I had to change a diaper, I only had to unzip just a bit at the bottom; the rest of Baby could stay warm and cozily covered.
ReplyDeleteI just did one for my daughter. I got brave and drafted my own pattern from her measurements. I also installed a separating zipper so I could open it up or the bottom. Yours looks great, I love how you lined it!
ReplyDeleteGenius!! These are super warm!! I made one last year from a pattern in a baby blue flannel for my then 3 month old daughter. I used it as a Maggie Simpson costume! I also made a yellow hat with 'spikey hair' I'll have to send you a pic.
ReplyDeleteThat looks so snuggly!! I linked to your tutorial over at Craft Gossip Sewing:
ReplyDeletehttp://sewing.craftgossip.com/tutorial-diy-sleepsack-for-babies/2010/11/21/
--Anne
Thank you SOOOO much for this! I made one for my little one.... http://fromonemommatoanother.blogspot.com/2010/12/sleep-sack.html
ReplyDeleteI gotta say, that is brilliant. My baby is due in June so I think I'll make one in just flannel to make a lighter weight one. And since I don't know if lil' one is a girl or boy, I'll just have to wait a few more weeks to start this one. Thinks for such a straight forward tutorial. (And that is one cute baby.)
ReplyDeletei love this, its gorgeous! far too warm for one of these here atm but im deffo gna be making one of these in the winter :) x
ReplyDelete